Scenarios are a really effective tool for sending out a series of Infos at the same time with only a couple of click when certain standard situations occur. The possibility to send various Infos with different contents, depictions and recipients with just one action is the main feature of scenarios. It is especially used for the escalation of IT problems (e. g. persons in authority will get a different Info as the end user) or in the event of an alarm, where several buildings have different escape routes or others methods that have to be considered.
To make this possible, a collection of predefined Info Templates will be summarized. These Infos can be sent at the same time with just a couple of clicks afterwards. This means that before a scenario can be completely created, appropriate templates have to be created before. More information about this topic can be found in the chapter Templates.
The App Scenario (Templates -> Scenario) is used for the management and sending of these Scenarios.
Creating a Scenario
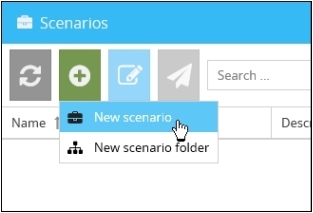
When you have a certain amount of Templates, you can summarize them to a scenario. Click on the button ![]() (New) in the toolbar and then on New scenario in order to create a new Scenario.
(New) in the toolbar and then on New scenario in order to create a new Scenario.
Enter the name of the scenario and optionally a description. The option Folder will be described later. The following settings are available in addition:
•Active: Inactive scenarios can’t be sent.
•Send Scenario: Allows changes to the Infotext, caption and background color before sending the scenario.
•All-clear Scenario: Allows changes to the Infotext, caption and background color before giving the all-clear.
Select the Templates you want to send with the scenario.
Simply click on each template in the selection list. Templates, which are summarized in a Templategroup, can be found by selecting the appropriate Templategroup.
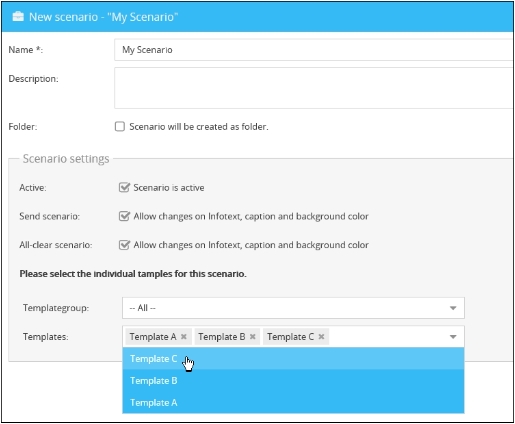
If a Templategroup has been chosen, only the contained templates will be shown in the selection list below.
Click on Save and the scenario will be created and displayed in the overview.
Sending a Scenario
Select a Scenario in the overview and click on the button ![]() (Send scenario) in the toolbar. An overview of all selected templates will appear. Here you have the opportunity to check the Infos before sending and to edit the caption and Infotext, if allowed.
(Send scenario) in the toolbar. An overview of all selected templates will appear. Here you have the opportunity to check the Infos before sending and to edit the caption and Infotext, if allowed.
With a click on Send Scenario all deposited Infos will be send.
Example: Creating and sending a Scenario
In this example a fire alarm is used as case of application, where three different recipient groups will be addressed with two different Infos. On the one hand all employees have to be informed about leaving the building immediately. On the other hand the persons in charge (manager and security) are commanded to ensure that all people have left the building.
Please proceed as follows in order to create an appropriate Scenario for this case:
1.Create with the help of filters and groups the different recipient groups first:
Service Desk Employees, Security and Manager.
More information about this topic can be found in the chapters Groups and Filters.
2.Create two Templates in the Infoeditor (New Info):
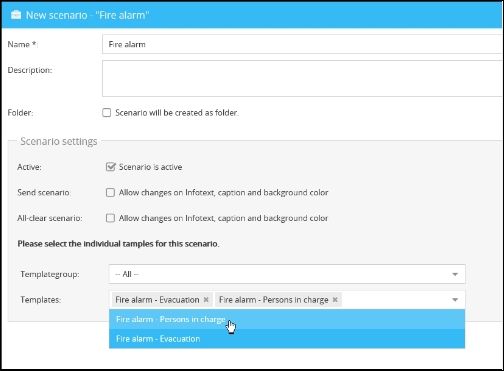
Template A: Fire alarm - Evacuation
Text example: “A fire alarm has been triggered! Please leave the building immediately!”
Recipients: Service Desk Employees
Template B: Fire alarm - Persons in charge
Text example: “A fire alarm has been triggered! Please ensure that all people have left the building and all windows and emergency fire doors are closed!”
Recipients: Security, Manager
More information about the creation of templates can be found in the chapter Templates.
3.Create a new scenario with the App Scenarios (e. g. Fire alarm) and assign the appropriate templates (Fire alarm - Evacuation and Fire alarm - Persons in charge) to it.
4.Select the scenario (Fire alarm) and click on the button ![]() (Post scenario) in the toolbar. The related Templates can be checked again before sending the scenario.
(Post scenario) in the toolbar. The related Templates can be checked again before sending the scenario.
5.Click on Send Scenario and the scenario will be send.
All deposited Infos will be sent to the appropriate recipients now.
Scenario folder
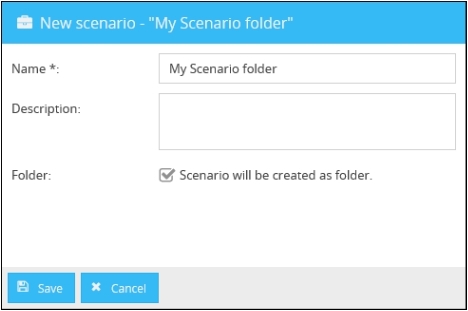
Here you have the opportunity to create Scenario folders, where individual scenarios and further folders can be subordinated. Click on the button ![]() (New) and select New scenario folder in order to create a scenario folder. Enter a name for the folder (description is optional), click on Save and the folder will be created.
(New) and select New scenario folder in order to create a scenario folder. Enter a name for the folder (description is optional), click on Save and the folder will be created.
If you select the folder in the overview now, there will be two additional options available when clicking on the button ![]() (New):
(New):
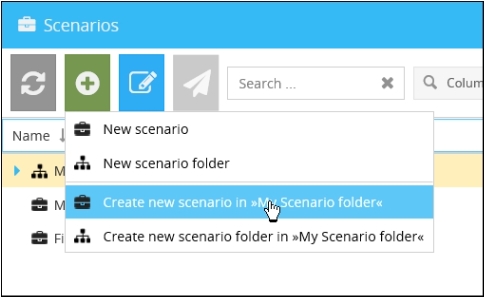
•Create new Scenario in »Folder name«
Creates a new Scenario in the selected folder.
•Create new Scenario folder in »Folder name«
Creates an additional folder in the selected Scenario folder.