Statusinfos enable a permanent display of a certain status. Affected users therefore can instantly perceive and react to changes.
The display of status informations is effected either as a taskbar and/or as a window on your monitor.
To manage your Statusinfos navigate to the app Statusinfo.
Create Statusinfos
A Statusinfo consists of three different components. The Statusinfo describes the overall topic of the information (e.g. “Server Status”). This Statusinfo can own multiple Status, like “Available” or “Not available”. A Status consists of a Statusdetail, which determites what and how the status is displayed.
First we need to create Statusinfos, in order to assign a Status. To do this, open app Statusinfo and click on the button ![]() (New) > New Statusinfo in the toolbar.
(New) > New Statusinfo in the toolbar.
In this form, you can set following properties:
•Name
•Description
•Reset StatusQuo after seconds: In this property, you can set a numeric value, which defines after how many seconds a currently active status will be reset to neutral (deactivation of the Statusinfo).
•Groups: Here you can define the groups, which are to receive the Statusinfo.
•All groups: Select this option to add all groups dynamically (current and new ones).
Example:
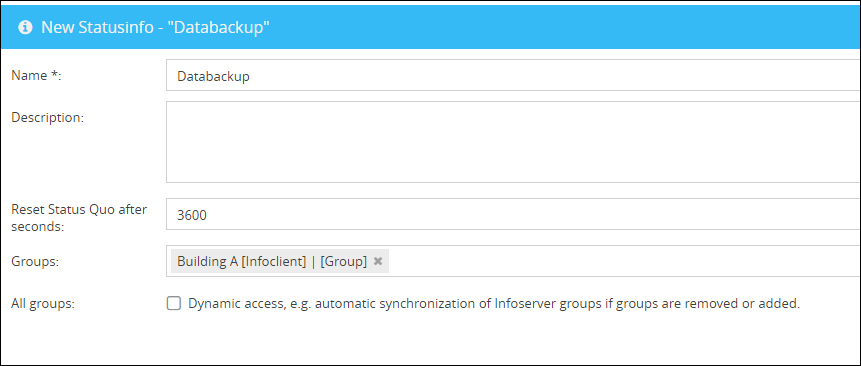
In a Statusinfo "Databackup", the group of administrators is to be informed about the begin of the daily/weekly databackup. 60 minutes after a change of the StatusQuo, the Statusinfo is to be reset.
After the relevant properties of the Statusinfo (Name, Status Quo Reset, Recipients) are set, the Statusinfo can be saved.
Create Status
To create a new Status, first select the Statusinfo you want to add it to and click on the button ![]() (New) > New Status in the toolbar.
(New) > New Status in the toolbar.
In this form, you can set following properties:
•Name
•Description
•Change Status: In this option, you can define that this status will switch to another status after a certain number of seconds.
•Restart main statusinfo time: If this option is selected, then the countdown for resetting the Statusinfo is started anew.
Example:
For the Statusinfo "Databackup", the status "Backup in progress", "Initiate daily backup" and "Initiate weekly backup". The status "Initiate daily backup" and "Initiate weekly backup" are supposed to switch to status "Backup in progress" ten minutes after activation. The status "Backup in progress" is supposed to be active for 60 minutes before the Statusinfo is reset.
Now, first create the status "Backup in progress" and activate the reset.
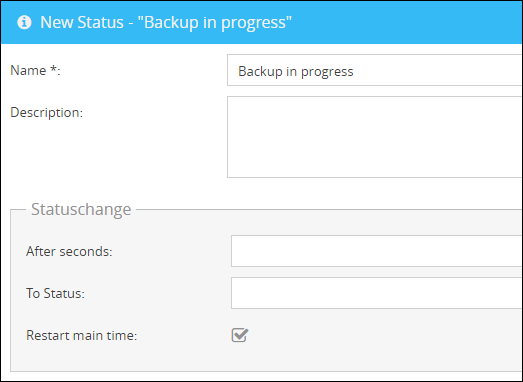
Now create the status for "daily" and "weekly" backup and set the successor status for each.
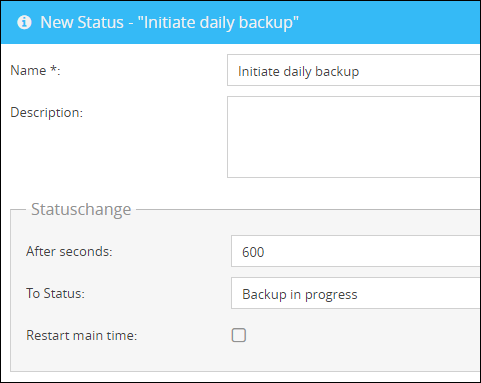
Save the Status. Now you can set the Statusdetails for each Status, in which the messagetext and other display-options can be set.
Create Statusdetail
In order to create a new Statusdetail for a Status, select the Status and click on the button ![]() (New) > New Statusdetail in the toolbar.
(New) > New Statusdetail in the toolbar.
Now you can set following options:
•Language
Select a language. The language refers to the operating system of the recipient.
•Channel
Select a Channel, which receivers should get a StatusInfo.
•Type
Select a message type. Depeding on the type, the background-color of the Statusinfo will vary.
•Caption
The caption is the headline of your Statusinfo.
•Info
Defines the text of the Statusinfo. You can format and add links or images to your message as usual.
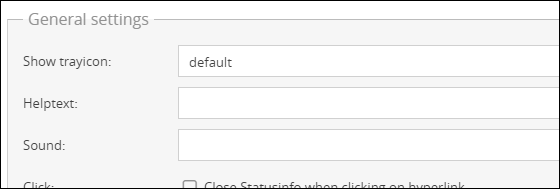
•Trayicon
Additionally to the statusinfo you can also change the trayicon which is displayed in the Taskbar.
In order to change the trayicon you have to upload a trayicon in the .ico format to the infoserver via the content app.
Now you can change the content path of the trayicon to your custom one.
If you want to switch back to the default trayicon you just have to insert the value default into the textfield.
•Hint
You can insert a description as hint for the Statusdetail. This will appear, e.g. when hovering with the mouse-pointer over an trayicon.
•Sound
You can also include an soundfile, which will be played upon display of the Statusinfo. The path to the soundfile must be provided as URL. For this, you can also use the Content Management of Cordaware bestinformed.
|
Please note: In case the specified soundfile can't be found, then a system-beep will be played instead. |
•Voice output
Here you can have Statusinfos read out loud via voice output. Further information can be found in the Voice output chapter.
•Click
Here you can specify whether the Statusinfo should be closed or canceled when you click on the hyperlink.
Behavior of the Statusinfo:
•Show trayicon
Defines if the trayicon is shown or not.
•User can close Statusinfo
Enables the user to close the statusinfo.
•Show Statusinfo on mouseover trayicon, show helptext otherwise
Here you can define if the helptext or the statusinfo will be shown during the mouseover over the trayicon.
•Show Statusinfo when clickiing on trayicon
Defines if the statusinfo is shown on a click on the trayicon.
•Closeable in X seconds
Here you can set a amount X of seconds after which the statusinfo can be closed.
•Fade time in seconds
Here you can define the face in time in seconds.
Example:
The Status "Initiate daily backup" is to be displayed for two minutes. The Info is for All Languages and should be accessible by a trayicon.
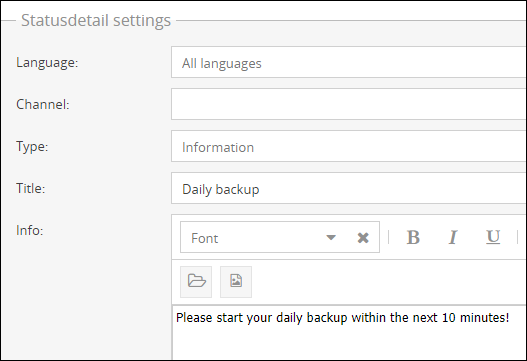
Additional Settings:
When setting the properties for the userdesktop, you can define whether a trayicon is to be displayed in the taskbar or not. Further on, you can set if the message is to be displayed on the desktop by clicking or by hovering with the mouse over the trayicon.
Set the displaytime to define the timespan for which the status window is to be visible. You also can set the time to unlimited while giving the user the option to close the window.
Initiate Status
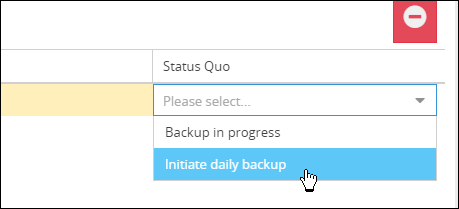
To set a specific Status for a Statusinfo navigate to the Statusinfo overview and select the status from a combobox within the column StatusQuo.
|
Please note: the Status will initiate right after selecting it. |