Examples in this chapter have to be copied and pasted in the edit source mode in the Infoeditor. |
Creating a resonse hyperlink via the response link generator:
With the response link generator you can create a response hyperlink quickly and easily.
Proceed as follows in order to create a response Hyperlink:
1.) Open the app New Info and click on the button ![]() .
.
2.) Now you have the possibility to create a response hyperlink via the response hyperlink interface:
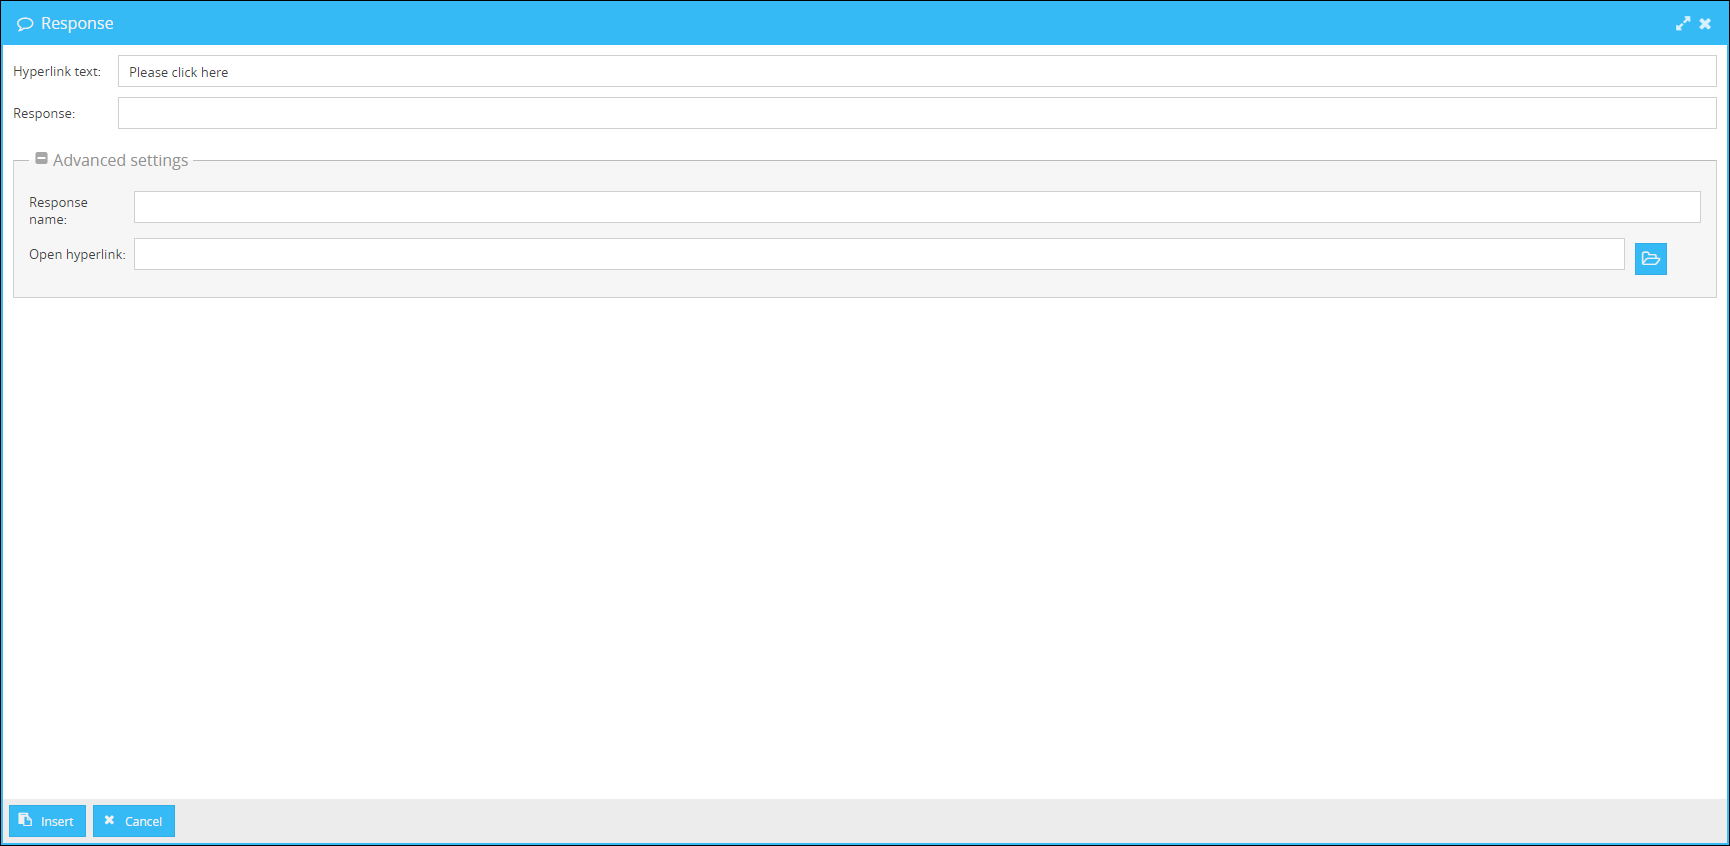
In the interface the following settings can be set:
Hyperlink text: |
Here you can select the text which will be displayed on the hyperlink. |
Response: |
Here you can set the answer which will be sent to the infoserver after the user has clicked on the hyperlink. |
Response name: |
Name of the column in the response overview in which the answer will be displayed. |
Open Hyperlink: |
Here you can add a file from the content management, which will be opened when clicking on the hyperlink. |
After clicking on Insert the Hyperlink will be inserted to your info.
User defined response hyperlinks with a specific ID of the Info:
By default, recipients can manually send responses to messages. Additionally, it is also possible to submit a response from the Infoclient by clicking on a specially designed hyperlink in the message. For setting a predefined response in a hyperlink you will need to set following value in the href-attribute of the hyperlink:
<a href="response:ID=%%ID%%,answer=Your Value">Please click here</a>
The response in a hyperlink consists of at least three items: the action-keyword response: as directive to send an automated response to the Infoserver (please mind that only the Infoclient is able to use this action-keyword), the declaration of ID of the Info (ID=%%ID%%) and the value of the answer. When saving the Info on the server, the wildcard %%ID%% in the ID declaration of the response will be substituted automatically by the internal ID of the newly created Info. The internal ID is used for identifcation the Info and allocation of the response. The value of the answer= item defines what is sent back to Infoserver when clicking the hyperlink.
In general, it is good practice to use a Scriptvar for setting the %%ID%% wildcard. When copying an Info without the wildcard as Scriptvar, then the autovalue of %%ID%% will be copied as well, therefore creating an incorrect allocation. When copying an Info with the wildcard as a Scriptvar, then the predefined (respectively previously applied) value will be copied as well, in this case the wildcard %%ID%%.
Follow these steps to create a scriptvar for the %%ID%% Wildcard:
Open the App ScriptVar (Templates -> ScriptVar) and put in the following details for a new Scriptvar:
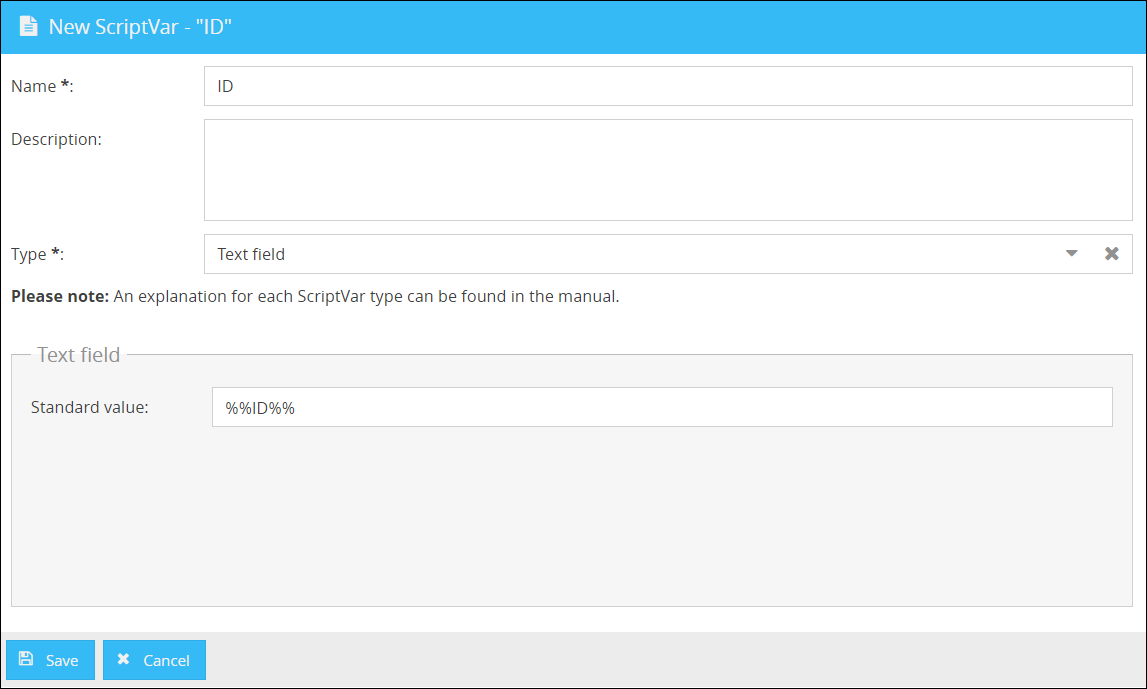
Now you can save the ScriptVar. You can now access the ScriptVar via the ScriptVar selection in the WYSIWYG Editor.
Custom Response-Label
Additionally, you can also set a custom label for the display of the answer in the reponse-overview by inserting the item responsename= in the response-definition:
<a href="response:ID=[ScriptVar=ID],responsename=CustomLabel,answer=Your Value">Please click here</a>
Quick Poll with response hyperlink
Use following HTML code for setting up a quick poll:
Please vote: <A href="response:ID=%%ID%%,answer=YES">YES</A> or <A href="response:ID=%%ID%%,answer=NO">NO</A> |
When clicking on either hyperlink in the banner, the predefined value of answer= will be sent as response.
Custom labeling of responses in response hyperlink
Use following HTML code for setting up a quick poll with custom labeling of the response values:
Please vote: <A href="response:ID=%%ID%%,answer=X,responsename=AGREE">YES</A> or <A href="response:ID=%%ID%%,answer=X,responsename=DISAGREE">NO</A> |
Opening an URL
By default, when clicking on a response-hyperlink, only the response is sent back to the Infoserver and no additional action is performed by the client. In case you want the client to send a response and open a website/url at the same time, then you can add the item open= to the response-configuration. The value of the item open= can be either a URL or special wildcards for manually submitting a response.
<a href="response:ID=[ScriptVar=ID],responsename=CustomLabel,answer=Your Value,open=www.cordaware.com">Please click here</a>
Opening a specific Response-URL for manually submitting an Answer
The open= wildcards for manually submitting a response are %%Response%% and %%Cancel%%. Both wildcards will open a special URL on the Infoserver where the recipient can manually submit a custom response text. When applying the %%Cancel%% wildcard, then the Info will get canceled/stopped on the Infoserver after the custom response-text is saved by the first submitting user. However, any user who has clicked the hyperlink can still submit a custom response.
<a href="response:ID=[ScriptVar=ID],responsename=CustomLabel,answer=Your Value,open=%%Response%%">Please click here</a>
<a href="response:ID=[ScriptVar=ID],responsename=CustomLabel,answer=Your Value,open=%%Cancel%%">Please click here</a>
Follow these steps to customize the form for the manual response:
1. Open the "Textfile" app under Contents > Textfile
2. Create a new textfile with the name: bi-template_response_html
3. Select the type “Text”.
4. Insert the following HTML code into this textfile.
5. To customize the response window, edit the HTML source code. The elements in a curly bracket are filled by bestinformed. You can also customize these in the HTML source code. You can find more detailed information in the following table.
|
Cancelling an Info with a Response-Hyperlink
In case it is required that the Info gets cancelled on the Infoserver initially and only by clicking on the hyperlink, then you can use the item cancel=1 in the response configuration.
<a href="response:ID=[ScriptVar=ID],responsename=CustomLabel,answer=Your Value,cancel=1">Please click here</a>
Predefined Response with additional URL
Use following HTML code for setting up a Response with a predefined answer and an additional URL that will open after clicking on the Hyperlink:
<a href="response:ID=%%ID%%,responsename=Confirmation,answer=OK,open=www.examplesite.com">Please click here to view our newest Terms and Conditions</a> |